Lathes have been around for centuries and are still used today in various settings. A wood lathe is a powerful tool that can be used to create beautiful and intricate pieces of woodwork.
Though their primary purpose is to create cylindrical shapes out of wood, they can also be used to create other objects. In order to get the most out of your wood lathe, it is important to understand how it works and what its capabilities are.
This article will explore 18 types of things you can create with a wood lathe and more information about how to get these creations done with visual explanations. From bowls and vases to candlesticks and more, there’s something for every level of Lathe user!
There are a variety of kitchen utensils that can be created using a wood lathe. By using different sizes and shapes of wood and different lathe attachments, you can create an endless array of useful and beautiful kitchen tools.
Spoons are one of the most commonly used kitchen utensils, and they can be easily created on a lathe.
To make a spoon using a wood lathe, first select a properly sized piece of wood. Cut the wood to the appropriate length and width, then sand it until it is smooth.
To create the bowl of the spoon, use a gouge to carve out a rounded area on one end of the wood. To shape the handle, use a chisel to create a series of parallel lines on the other end of the wood. Finally, use sandpaper to smooth everything out.
Chopsticks are another popular kitchen utensil, and they can also be made on a lathe. You’ll need to use a thinner piece of wood for chopsticks than you would for spoons, and they’ll need to be a bit longer as well.
Once you’ve turned your chopsticks on the lathe, you can sand them down to create a smooth, polished finish.
Honey Dippers are a unique kitchen tool that is perfect for drizzling honey over food. To make a honey dipper, turn a piece of wood on the lathe and then shape the end into a small spoon.
The first step is to cut the stock to length. If you’re using a square or rectangular piece of stock, you’ll want to make sure that the length is equal to the width.
This will ensure that your honey dipper is symmetrical. Once you’ve cut the stock to size, use a saw to make a 45-degree angle cut on one end.
Next, mount the piece of wood on the lathe. You’ll want to start by centring it on the lathe, then secure it in place with a set of lathe chucks.
Once the piece of wood is mounted on the lathe, use a gouge to shape one end into a spoon. The spoon doesn’t need to be perfect, but you’ll want to make sure that it’s symmetrical.
Once you’ve shaped the spoon, use a chisel to create a series of deep parallel lines on the other end of the wood.
This will create the honeycomb effect that’s characteristic of honey dippers. Finally, use sandpaper to smooth everything out. Once you’re finished, your honey dipper is ready to use!
Egg Holders are another essential kitchen tool, and they can also be made on a lathe. Egg holders come in a variety of sizes and shapes so that you can find the perfect one for your needs.
Just like we discussed in making a spoon, the main task is to make an appropriate bowl that holds the egg and then sanded down to create a smooth finish.
Bottle Openers are another kitchen tool that can be easily made on a lathe. First, you’ll need to cut a piece of wood to the desired shape and size.
Next, use a lathe to shape the piece of wood into a cylinder. Once the cylinder is shaped, you’ll need to create a small hole in the centre of it for the metal key ring. Finally, sand and finish the wood to your liking.
Whether you’re looking for a unique gift for someone special or want to add a personal touch to your home décor, hand-crafted wooden tableware is always a welcome addition.
Wooden Bowls are a unique touch to your table. To make a bowl, the first step is to mount the bowl blank onto the lathe. You can do this by either bolting it down or clamping it in place. Then, use a gouge to create a round shape on one end of the blank. Be sure to keep the angle consistent as you turn the blank.
Once you have a round shape, use a skew chisel to hollow out the centre of the blank. This will form the interior of your bowl. Be careful not to cut too deeply into the wood, or your bowl will be too shallow.
Finally, use a parting tool to create a lip on the edge of your bowl. This will give it a finished look and make it easier to pour liquids out of. Once you’re finished, sand the bowl down to create a smooth finish.
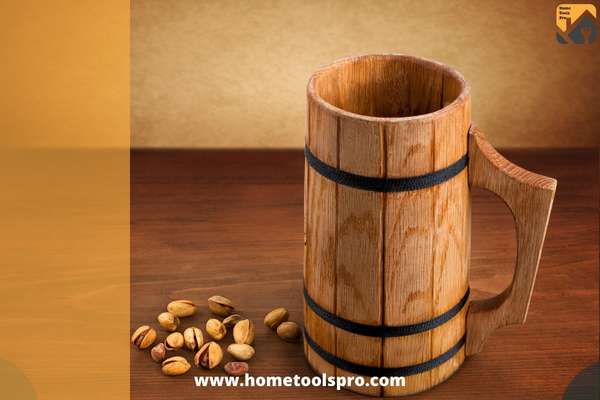
Wooden Mugs are perfect for coffee, tea, or hot chocolate. To make a mug, start by cutting a blank to the desired shape and size.
Next, use a lathe to create a cylinder out of the blank. Once the cylinder is shaped, use a gouge to create a handle on one side of the mug.
You can make the handle as big or small as you like. Just be sure to leave enough room for the mug’s rim. Finally, use a parting tool to create a lip on the edge of the mug. This will help prevent liquids from spilling over the edge. Once you’re finished, sand the mug down to create a smooth finish.
Wooden Mugs
Wooden Plates are perfect for serving food or displaying decorative items. To make a plate, start by cutting a blank to the desired shape and size.
Use a lathe to create a flat surface on one side of the blank. Once the surface is flat, use a gouge to create an evenly-spaced series of grooves around the edge of the plate.
These grooves will form the rim of your plate. Finally, use a parting tool to create a small lip on the edge of the plate. This will help keep food from sliding off the edge. Once you’re finished, sand the plate down to create a smooth finish.
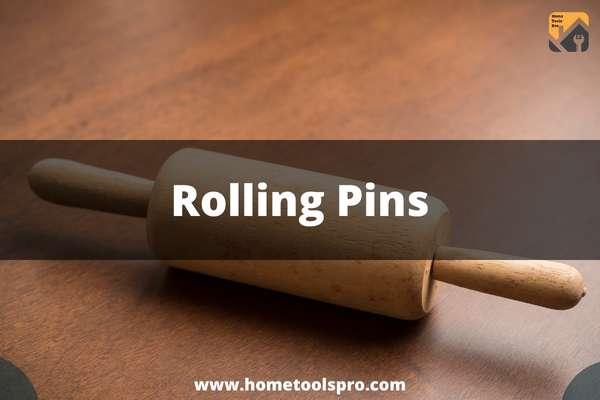
Making a rolling pin is a fun and easy project that you can do in your woodshop. To start making, choose your wood, and cut it into a blank that is about 18 inches long and 3-4 inches in diameter.
Start by cylindrically shaping one end of the blank on your wood lathe. Then, cut out a small groove in the centre of the cylindrical shape. This will be where you insert the metal key ring later.
Next, use a gouge to create a spiral design on the blank. Start at the centre and work your way out to the edge. Be sure to keep the spiral consistent as you turn the blank.
Finally, use a parting tool to create a small lip on the edge of the blank. This will help keep the rolling pin from slipping out of your hand. Once you’re finished, sand the rolling pin down to create a smooth finish.
Rolling Pins
4. Spice Shakers
Making a spice shaker using a wood lathe is a relatively simple process. You will need to start by shaping the body of the shaker on the lathe.
Once you have the basic shape created, you can then use various drill bits to create holes for the spices. Be sure to make the holes slightly larger than the spices themselves so that they can easily be dispensed.
Finally, sand and finish the shaker to your liking, and it will be ready to use!
Making a mortar and pestle using a wood lathe is a relatively simple project that can be completed in just a few hours. The first step is to find a suitable piece of wood for the project.
Hardwoods such as oak or maple are ideal, but any wood will work. Once you have the piece of wood, mark out the dimensions of the mortar and pestle on it.
Next, use a sharp chisel to carve out the bowl of the mortar.
Be sure to make the sides of the bowl nice and straight so that it will be easy to grind spices in it. Once you have carved out the bowl, sand it smooth with progressively finer grits of sandpaper until it is glass smooth.
Now it’s time to turn your attention to the pestle. Start by shaping one end of it into a rounded point.
This will be the end that you use to grind spices in the mortar. Once you have shaped the pestle, sand it smooth with progressively finer grits of sandpaper until it is glass smooth.
6. Flowerpots
Flowerpots
There are a few steps in making a flowerpot using a wood lathe.
The first is to find the right piece of wood. It needs to be cylindrical with a flat bottom so that it can stand upright.
The ideal dimensions are about 6-8 inches wide and 12-18 inches long. If the wood is too thick, it will be difficult to turn on the lathe, and if it is too thin, it may break.
Next, use a band saw or jigsaw to cut the wood into the desired shape. Then, use a belt sander or sandpaper to smooth out any rough edges. The final step is to mount the wood on the lathe and turn it into a cylinder.
Once you have shaped the cylinder, use a drill bit to create drainage holes in the bottom. Be sure to make the holes slightly larger than the size of the plants’ roots so that they can easily be inserted.
Finally, sand and finish the flowerpot to your liking, and it will be ready to use!
7. Small Storage Containers
Making a small storage container using a wood lathe is a fun and easy project that can be completed in just a few hours.
To begin, cut the piece of wood to the desired length. Then, using the chisels, start shaping the piece of wood into a cylinder.
Once you have formed a cylinder, use the bowl gouge to shape one end into a rounded point.
Next, use the rasp to create indentations on the sides of the cylinder. These will be used for grip when opening and closing the container.
Once you have created the indentations, sand the entire piece of wood down with progressively finer grits of sandpaper until it is smooth.
If desired, you can now stain or paint the container. Finally, use the wood lathe to create a tight-fitting lid for the container.
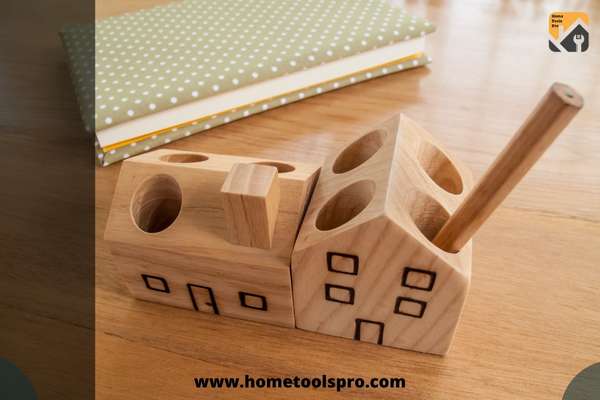
8. Pens & Pen Holders
Pens & Pen Holders
First, select the right wood for the project. I would recommend using a hardwood like oak, maple, or walnut. Softwoods like cedar or pine are not a good choice because they are too prone to splitting and warping.
Next, you need to rough out the basic shape of the pen and pen holder with a bandsaw or jigsaw. Be sure to leave enough extra material so that you can finesse the final shape with a hand plane or sandpaper.
Then, it’s time to turn the project on the lathe. Start by mounting the wood blank onto the lathe shaft. Then, use a chisel to form a cylinder shape from one end of the wood blank to the other.
Once you have created the cylinder, use a drill bit to create a hole through the centre of it. This will be used to insert the pen nib.
Now, use a gouge or chisel to shape the ends of the cylinder into whatever shape you desire. After shaping the ends, sand the entire piece with progressively finer grits of sandpaper until it is glass smooth.
Finally, insert the pen nib into the hole, and your pen is ready to use! If desired, you can also create a matching pen holder just like we discussed, creating a small storage compartment to go with it.
9. Table/Chairs, Louvers & Hand Railing Spindles
Making spindles on a wood lathe is a fairly simple process. First, you need to select the appropriate size and type of wood for your project.
Then, you’ll need to cut the piece of wood to the desired length and shape it with a chisel or hand saw. Finally, you can use the wood lathe to spin the piece of wood and create the desired shape and finish.
10. Baseball Bat
Baseball Bat
Baseball Bat can be fully made using a Lathe. Here are the steps to be followed.
You’ll need to select a piece of wood that is long enough and has the appropriate diameter. You’ll also need a coping saw and some sandpaper.
Cut the selected piece of wood to the desired length with the coping saw. Use sandpaper to smooth any rough edges.
Next, secure the piece of wood to the lathe with either clamps or a chuck. You’ll want to make sure that it is spinning smoothly before you start shaping it.
Start shaping the bat by using a roughing gouge to remove larger chunks of wood. Once you have achieved the overall shape that you want, use a skew chisel to create the barrel of the bat.
After you have shaped the barrel, use a gouge or skew chisel to create the knob on the end of the bat. Finally, sand the entire bat with progressively finer grits of sandpaper until it is smooth.
11. Wooden Thread Spools
Making a Wooden Thread Spool is a fairly easy process.
You’ll need to find a piece of wood that is long enough and wide enough to fashion into a spool. Then, using a ruler or some other measuring tool, mark out the dimensions of the spool onto the wood.
Next, it’s time to get started on shaping the wood. If you’re using a lathe, begin by chucking the piece of wood onto the lathe bed.
Then, use a sharp turning chisel to start carving away at the marked-out dimensions. As you carve, keep an eye on the overall shape of the spool so that you don’t stray too far from the desired dimensions.
Finally, use a piece of sandpaper to smooth out the entire surface of the spool. If desired, you can also finish the spool with a coat of paint or varnish.
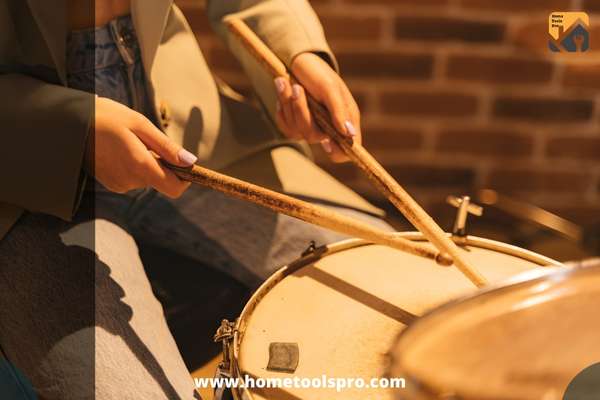
Making drumsticks is a fun project that can be completed on a wood lathe.
You will need a wood lathe, wood blanks, chisels, knife, sandpaper, hand drill, tape measure, and clamps. Making it is fairly easy, just like we discussed making chopsticks. So try out making your own Drum Sticks today.
13. Justice Mallet
As you know, Justice Mallets are used by law enforcement officers to break open car windows in emergencies. They can also be used as self-defence weapons.
Making a Justice Mallet is a fairly easy process that can be completed with a few simple tools and materials.
First, you will need to gather a piece of wood that is at least 18 inches long and 3 inches wide. You will also need a wood lathe, chisel, coping saw, sandpaper, and wood glue.
Use the lathe to turn the piece of wood into a cylinder that is 3 inches wide and 18 inches long. Cut off one end of the cylinder with the chisel to create the mallet head.
Then use the coping saw to cut a notch into the other end of the cylinder. This will be used to grip the mallet when it is being used.
Next, use sandpaper to smooth out the entire surface of the mallet. Finally, glue the two pieces of wood together and allow them to dry overnight.
There are a few different ways that you can make jar and bottle lids using a wood lathe.
One method is first to create a cylindrical blank that is slightly larger than the circumference of the lid. You can then use a gouge or other sharp tool to shape the blank into the desired lid shape.
Another method is to start with a disc-shaped piece of wood that is large enough to cover the opening of the jar or bottle. You can then use a skew chisel or other turning tool to cut out the centre of the disc, leaving you with a ring that can be used as a lid.
Whichever method you choose, be sure to sand the surface of the lid smoothly before applying any finish.
15. Waring Accessories: Bangles & Rings
There are several ways to make bangles and rings using a wood lathe.
One way is to first create a ring blank by turning a small disc of wood on the lathe. Once the blank is created, you can then shape it into a ring using various shaping tools.
Another way is to turn a slender rod of wood on the lathe and then carefully bend it into shape using your hands or pliers. This method requires more patience and care but can be used to create more intricate designs.
Whichever method you choose, always work slowly and carefully to avoid mistakes because bangles and rings could easily break while making.
There are many, many possibilities for ornaments that can be turned on a wood lathe. Some popular ones include Christmas ornaments, Easter eggs, pumpkins, Santa Clauses, and snowmen.
In addition to the traditional shapes and designs, you can also use a wood lathe to create more intricate ornaments. For example, you could turn a small birdhouse or a delicate figurine. The sky is really the limit when it comes to what you can create with a wood lathe!
17. Candle Holders
Candle Holders
First, you’ll need to gather your supplies. For this project, you’ll need a wood lathe, some wood glue, clamps, sandpaper, and of course, a candle holder. You can find all of these items at your local hardware store.
Once you have your supplies, it’s time to get started! Begin by setting up your wood lathe according to the manufacturer’s instructions. Once it’s all set up, clamp your piece of wood onto the lathe.
Now it’s time to start shaping your candleholder! Use the lathe to slowly turn the wood while shaping it with your other hand. As you work, be sure to check your progress and adjust accordingly regularly.
18. Wooden Toys: Ex Spinning Top
You can make toys out of just about any type of wood that is available. Just about any hardwood will work well, but you can also use softer woods like pine or poplar.
One common toy that can be made on a wood lathe is a spinning top. You can also make wooden puzzles, ornaments, and other small items.
If you’re new to woodturning, it might be a good idea to start with some simple projects until you get the hang of it. There are lots of great tutorials online that can show you how to make various types of wooden toys.
Conclusion
As you can see, there are many different things that you can make with a wood lathe.
From bowls and vases to bangles and rings, the sky is really the limit when it comes to what you can create. With a little practice, you’ll be able to make just about anything you can imagine!